How to Create a Website With Squarespace — The Ultimate Guide
If you’ve been following my blog for any period of time, you might have noticed that I talk about Squarespace. A lot. Like, a lot, a lot. I can’t help it — after many years of coding websites from scratch and trying out many different platforms, I’ve finally found my bliss with Squarespace and I happily recommend it to all my clients, friends, family, and honestly, anyone who asks me what they should use to build their website.

But throughout all these posts, I’ve never really written how to get started with Squarespace. So it’s time to change that. In today’s post, that’s exactly what I’ll be talking about. I’ll go over how to create your website strategy, how to build a website with Squarespace, explain which Squarespace template you should use for your website, essential things you have to do before building your website with Squarespace, and, of course, how to customize your Squarespace website.
Heads up: if you want to follow along with this post, I’ve got a free website training and roadmap for you to download. It covers all of the steps in this process so put your fingers to work and plop your email below so I can send it your way:
So now that you have your roadmap, there’s two more things you need to do:
Brew yourself a nice pot of coffee or tea
Put on your favorite playlist
I’m kidding of course. Those two things are entirely optional but I find I always work better with a nice hot cup of coffee and my favorite tunes in the background. So if that’s you too, go ahead and get those things ready. I’ll wait.
Everything set? Coffee in hand? Playlist on? Okay then, let’s get cracking.
Table Of Contents
The Secret to a Successful Website Build And Design Process
Step 2: Website Inspiration And Features You Want
Step 3: Design Decisions And Creating Your Brand Board
Step 4: Mapping Out Your Squarespace Pages
Step 5: How to Get Started With Squarespace
Step 6: How to Build Your Website With Squarespace
Step 9: Connect Your Social Media Accounts
Step 10: Setup Analytics And Pixels
Step 11: Take Care Of Technical Settings
The Secret to a Successful Website Build and Design Process
Before we do a deep dive into the whole website design and build process, I want to explain what goes into creating a successful website and what a successful website is to begin with.
Your website is your online home. It’s where your followers and potential clients go to learn more about you. It’s where people land on when your website (whether a page or a blog post) shows up as a relevant search result when they google words related to what you do.
As such, your website should work for you. It should do most of the selling for you and it should also do most of the “pre-qualifying” clients and customers for you. Otherwise, you have a very expensive but rather useless piece of the Internet real estate.
With that in mind, there’s two parts to creating a website that works for you:
Creating your website strategy first (which doesn’t sound exciting but it’s crucial if you want to rely less on paid advertising and more on organic traffic)
Actually building and designing your website to align with that strategy (which is the super exciting part and the real reason you’re reading this post)
Stick with me and trust the process and I promise you, you’ll walk away with a website you love and one that actually converts those random visitors into your subscribers, customers, clients, and loyal fans.
Step 1: Prep Work
First things first: let’s take care of that prep work I’ve mentioned earlier. Doing this beforehand will simplify the entire website building process later on and allow you to knock out your website much faster. On top of that, it will help you decide and determine what features your website should have so that you know what to include.
1. What kind of website do you want?
So with that said, the absolute first thing you need to do is decide on what type of website you want. Typically most websites fall into the following categories:
Brochure site - though simple, a brochure website has 4-5 pages that present your services, your history, mission statement, and vision and allows customers to initiate a discovery call or other type of communication.
Portfolio site - presents your past work on top of showcasing your services and allowing people to get in touch with you.
One-page site - a site that doesn’t have a lot of content and has only one page. The menu links to other parts of the page instead of other pages on your website. Suitable for a startup phase when you’re focused on generating leads. Clients/Customers can see what you do and offer and contact you.
E-Commerce site - a site aimed for product-based businesses that allow customers to purchase goods and products online. You can sell digital and physical products with Squarespace.
Website with a blog - any of the above with the addition of a blog. Squarespace makes it easy to add a blog page and you can even have multiple blogs on the same website. This is handy if you have a business that serves two different types of clients or customers and want to create targeted content for both of them.
2. What’s your website goal?
Ok, so now that you’ve decided on the type of website you need, it’s time for the second part of the prep work and that’s getting absolutely clear on your website goals. Goals seem scary, I know. But I promise you, your website goals are not the same as New Year’s goals where you set a goal to give up chocolate and then cave in when you find your stash of Reesee’s cups. Just me? Oh well...
Now your website goals should align with your overall business goals and help you grow that same business.
So for example, your website goals could be:
to book X number of clients per quarter
to increase the number of your email subscribers
to position yourself as the authority in your field
to become the go-to resource for a particular topic
enroll x amount of people in your course or membership program

Choose between 1-3 goals for your site as anything more than that will be too confusing for your visitors and makes it harder to design a website that converts well.
Once you have your goals set, you will need to determine what you’ll need to integrate into your website. This can include things like setting up your Google Analytics account, creating your editorial calendar, coming up with a lead magnet, integrating an email service provider, etc.
3. Who is your ideal client?
The next step is to get super clear on your ideal client. Your ideal client is the person who would be the perfect fit for your products and services. And when you know your ideal client, everything becomes so much easier. Your website messaging becomes easier to write, your social media posts take half as long as they used to, and you’re attracting the right people into your business.
And I’ll let you in on a little secret -- your ideal client is probably very similar to yourself so don’t shy away from reflecting on your past self.
A few questions to consider when coming up with your ideal client include:
What’s their name, age, and gender?
Where do they live and who do they live with?
What are their interests? What magazines do they read? Which websites do they visit?
Which social media profiles do they use the most?
What is their main goal as it relates to what you’re offering?
Who or what is stopping them from moving forward?
What’s something your audience is only saying to themselves? Something they’d write in their journal? Tell their best friend but not anyone else?
What is the most basic version of their problem as it relates to your offers?
What things happen in your industry that piss off you + your clients?
What happens when they work with you, buy your product?
Why is it important to you? What experiences help you understand what they’re going through?
What experience makes you the expert? Do you have training? A certificate?An award?
What does it look like if they don’t work with you, buy your product, or hit their goal?
What does success look like? What does an average day look like? How do they feel?
What is the transformation they go through?

Now, I get that these questions might seem intimidating but here’s the thing — this isn’t a test. Take your best guess for now or better yet — find one person online (in a Facebook group, on Instagram or anywhere else) who you think would be a great fit for your services. Stalk their social media profiles (in a non-creepy way!) and pay attention to how they talk about their problems, what they do in their daily life, what matters to them the most. Then use that knowledge to come up with answers.
Keep in mind that your ideal client profile will change over time as you grow your business, but it’s important to have some kind of baseline to start from.
My ideal client profile has changed a lot throughout the years as I got more clear on exactly what it was I wanted to offer and that change also influenced how my business evolved too. It’s an interconnected thing so having an idea of your client profile is super important when building your website.
Step 2: Website Inspiration & Features You Want
Phew, that was a lot we covered in step 1. But now, get ready for some serious fun. This step is where we start bringing your website to life.
The most important thing to remember about this section is to remember that your website is not really about you. It’s about your ideal client. In other words, your website style should appeal to your website visitors while your personal preferences take somewhat of a backseat seat. However, it is entirely possible that you and your ideal client are very similar so don’t feel like you can’t use your favorite shade of blue.
For this part of the exercise, the best course of action is to head on over to Pinterest and start searching for website examples.
Create a secret board, search for terms like website examples, website design, website template, and similar and pin away. As you pin images, add a little note to yourself about what it is about a particular site that caught your eye. Is it the color scheme? A font? Or a general look and feel?
The point of this exercise is not to copy someone else’s design but to get a feel for the look and vibe that you want your website to have. For example, if you pin a lot of bold and bright website designs, then it makes sense to use bright colors and bold fonts in your own website.
Another thing to search for on Pinterest are words and phrases that reflect how you want your visitors to feel when they visit your site. For example, if you want them to feel happy and inspired to take action, you should steer clear of dark and moody images.
Related reading: 6 Designer Hacks To Make Your Website Look Less DIY

A few things to pin include: logos, patterns, icons, fonts, moodboards, fashion, interior design, food, coffee...any image that captures your attention and gives off the feeling you want your website to have.
I’ve got a video for you that goes a bit more in-depth about this process. You can watch it below to see how to create an inspiration or a mood board with Pinterest.
When you’re done creating your inspiration board, fire up a Google Doc and compile all those notes into one document that you can reference later on. You’ll want to note down the dominant colors, general style, how you want your visitors to feel, and features from each website that you’d like to have. This can include things like:
Blog with a sidebar
Three-column footer
Newsletter optin at the bottom of each page
Button in the main menu at the top
etc.
Step 3: Design Decisions And Creating Your Brand Board
So. Inspiration is all gathered, now it’s time to make some design decisions. In this step, you get to decide on your final website colors and fonts as well as create a brand board for your website.
A brand board is basically a style guide for your website. It serves as a guideline to help you decide on your final website style (and influences all other design decisions as well.). It’s the one document that you’ll want to refer over and over again, not just for your website but for your social media graphics, and other collateral you’ll end up designing.
Things to include on your brand board board:
3-4 photos that represent the general look, feel, and vibe you’re going for
Final website colors
Your logo
Fonts you’ll use on your website
Patterns, illustrations or other graphical elements that you’ll use for your brand
I have a free Canva template that you can copy and use to create your own brand board. Then, download it as a PDF, print it out, and keep it somewhere handy whenever you’re designing something for your business.
Step 4: Mapping Out Your Squarespace Pages
The next step is to decide on the pages that you’ll include on your website. This will make it easier to design your website later on because you’ll know exactly which pages you need and what to include on each page.
There are three steps to this process:
Map out how visitors will navigate around your website
Decide which pages you need and what is the goal for each page
Decide which pages will be in your main navigation and which pages will be in your footer navigation.
Let’s tackle them one-by-one.
1. Visitor Flow
Let’s say you’re a health and wellness coach who wants to fill your schedule with discovery calls. When a visitor lands on your site, you want them to check out your about page, check out your coaching programs, and book a discovery call.
They may land on your site through a blog post or they may find you through a random Google search. In that case, your visitor flow could look like this:
blog post --> about --> services --> discovery call page
Or it could look like this:
homepage --> coaching package 1 --> discovery call page
2. Pages and Calls to Action (CTAs)
Once you know what the visitor flow could look like, it’s time to refer back to step 1 and make note of your website goals as well as your ideal client profile. Then, think about what your ideal client needs to know before they book your services or buy your product.
For example, let’s say you’re an interior designer who provides virtual and in-person styling sessions. Your ideal client is probably looking for the information on the available times for the styling session, do you work with residential homes or corporate offices, a portfolio of your past projects, the price, if they need to prepare anything, and the steps needed to book a styling session.
Here’s another example: you have a yoga studio and you want to bring it online due to the current situation. (ahem, Covid-19 and the general shitstorm that this year has blessed us with). Your ideal client wants to know what type of yoga you teach, how they can register for the class, and how they can access the online classes.
If you’re not entirely sure what your ideal client wants to see or needs to know, then there’s one simple solution: ask them! Go wherever it is that your dream client hangs out and share a post that tells them you’re doing a bit of market research and looking for people who fit the profile to jump on a quick call with you. You can even offer them a free session, a free trial or a gift card as an incentive.
Looking back at our interior designer example, you’ll need to include a home page, a portfolio page, an about page, services page, and a contact page.
You could (and should!) also include a downloadable PDF with 10 tips to prepare for a home styling session that your visitors will get in exchange for their email address. Once they download the PDF, you can follow up with them over the course of 5-6 emails and invite them to book a free consultation call with you.
What this does, it allows you to nurture a relationship with your website visitors and allows them to get to know you better. It also removes the pressure from having to constantly sell and is basically generating leads for you on autopilot.
You might be wondering why this matters. Here’s a bit of sad news: 98% of website visitors won’t buy when they first land on your website.
BUT if you offer them something valuable in exchange for their email address, you have the perfect opportunity to earn their trust and convert them from subscribers into buyers. And let’s face it: it’s a lot easier to say yes to a free offer than it is to immediately book a 4-figure service package.
As far as calls to action go, your homepage could have a call to action to sign up for the freebie and check out your about page. Your about page should point them to your services page and your services page should send them to your contact page where they can initiate the process of working with you.
3. Main Navigation and Footer Navigation
The next step is to decide which pages you’ll add to your main navigation (at the top of your website) and which ones you’ll add to your footer.
Keep your main navigation down to a minimum. I recommend having no more than 4-5 links in there as anything more becomes too overwhelming for your visitors.
The pages in your main navigation should be the most important pages on your site that help you achieve your website goals.
Consider including these on your website pages (or use them as an inspiration for content to include on each page):
Testimonials
Press links
Social media feeds
Professional Bios
Headshots
Personal details
Credentials / experience
Videos
Features & benefits of your products/services
Prices & packages
Case studies
Portfolio
Opt in forms
Contact forms
Related products
Gift guides & wishlists
Product reviews
Product tutorials
4. Write Your Website Copy
Once you know which pages you want and you’ve mapped all the pages and the goals of your website, it’s time to write your website copy. The easiest way to do this is to write it all out in a Google Doc and then copy/paste it into your Squarespace website.
Doing so will give you a backup of your website copy and make it easier to update the copy later on. The main piece of advice I have for you is to focus on your ideal visitor and think about what THEY need to know before they take action. Here are a few other copywriting tips to keep in mind:
1. Get Clear On Your Brand Message
Your brand message should immediately make it clear what you do, who you do it for, and how you do it. This is also known as your brand mission statement and the main purpose is to weed out clients who aren’t a good fit and make those that are, stay on your website and explore further.
This message should be front and center, easy for anyone to see. When a potential client comes to your website, they need to immediately know if they’re in the right place (if you’re the right person to help them or not). Example: I design Squarespace websites and templates for small business owners so they can launch and grow their businesses easily and quickly.
2. Focus On Your Ideal Client
One big mistake many business owners make is that they focus their website on them instead of their dream clients. Even though it is your website, your clients won’t care about your life story. They will, however, care how you can help them and what makes you qualified to do so. Keep the copy focused on your ideal client and answer questions they might be asking about your services and you’ll be golden.
3. Avoid Jargon
Keep your copy clear and simple so your dream customers can easily understand what you offer. Remember, YOU are the expert so while the industry terms and jargon might be familiar to you, chances are they won’t be familiar to your clients.
4. Keep It Short And Sweet
Most website visitors won’t read walls of text. When you write out the content of any page on your site, read through it and then trim it down in half. Use short sentences, headings, and bullet points to keep the copy easy to scan.
5. Use Your Brand Voice
Make sure to use your brand voice and sound natural throughout your website copy. The easiest way to do that: write like you talk. Another tip when it comes to your brand voice is to use words and phrases that your ideal client would use. You can search through Facebook groups or look at their Instagram profiles to see what words and phrases they’re using when they’re talking about their problems.
5. Gather Photos For Your Website
Photos can make or break your website. Photos can help you tell your story better, connect with your audience, and make a lasting impression on your website visitors. Your website photos are just as important as your colors and your fonts. And with that in mind, I have a few tips for you that will make it easy to choose the perfect photos for your website.
Before you do anything else, remember one thing: the photos you choose for your website should reflect your brand. In other words, they need to give off the exact vibe that you want visitors to have when they interact with your website.
For example, a fun and bright brand would give a completely different vibe if they used black and white images or images with a muted color scheme.
Step 1. Pay Attention To Colors And Filters
If you’ve already selected your brand colors, the most logical choice is to use photos that have the same or complementary color scheme.
Try putting your brand style guide next to your photo collection and see if they look good together.
Create a collection of images and put together a mood board or a collage including your brand colors to see if the entire thing flows well together and looks visually appealing
Aside from colors, you also want to pay attention to filters or overall color tones used in the photo. Are they more warm or are they more cool? Stick to the same filter or color tone in all your photos to make sure your website looks cohesive.
Step 2: Photo Mood
As you’re compiling images, think about the overall mood of the photos. What feelings come up when you look at them? Make sure the mood of the photos matches the mood you want your brand to convey.
Step 3. Target Audience
Your images have to appeal to you but they also have to appeal to your target audience. Avoid using photos that wouldn’t resonate with your ideal audience. For example, if you’re targeting busy moms who want to find time to exercise, you shouldn’t pick a photo that portrays cars or waterparks.
Step 4. Do All Images Work Together?
Lastly, look at all the images you’ve chosen for your website and make sure they all flow together nicely. If there’s even a single image that’s throwing you off, it’s better to leave it out or find a different one. Remember, your images have to give a curated and cohesive vibe which will make you look like a professional that you are.
5. Include a mix of photo orientations
Be sure to include a variety of photo orientations. Remember, for most pages, you’ll want horizontal, wide orientation with plenty of white space so you can include text and buttons, without making the photo look too busy.
Vertical orientation comes in handy for your about page or your services page to showcase different service packages.
Square photos can be used in the same fashion — to showcase photos of you, your team or your services and products.
Finally, if you’re wondering where to find images for your site, I’ve got you covered. A few places to find free images for your site include Unsplash, Pexels, and Pixabay. If you want paid stock photos, my personal favorites include Haute Stock, Moyo Studio, PixiStock, Eye For Ebony, and She Bold Stock.
Step 5: How to Get Started With Squarespace

By now, you’re probably itching to get started with your website and I can’t really blame you. Here’s the thing — I could have jumped straight into signing up for Squarespace trial and explaining how it works, how to add pages, and all that happy stuff.
But a website without strategy won’t do you any good. That’s why we took care of all the prep and planning BEFORE even touching with Squarespace. Now that we have the foundation in place, it’s time to get started with Squarespace.
1. Visit Squarespace and sign up for an account
Go to Squarespace.com and click on the Get Started button. You’ll be taken to a page where they will ask you to share a few details about your website, like what’s your site about, what are your website goals, and where are you in the process of building a website.
You can skip through these sections as we pretty much covered it throughout this article or you can go through them. Either way, you’ll end up in the same place: the page where you can choose your Squarespace template.

Important note before we go on: as of 2020, Squarespace released the new version of Squarespace 7.1. What this means is that it doesn’t matter which template you choose as they all share the same base. In other words, you can pick Hester and make it look like Paloma.
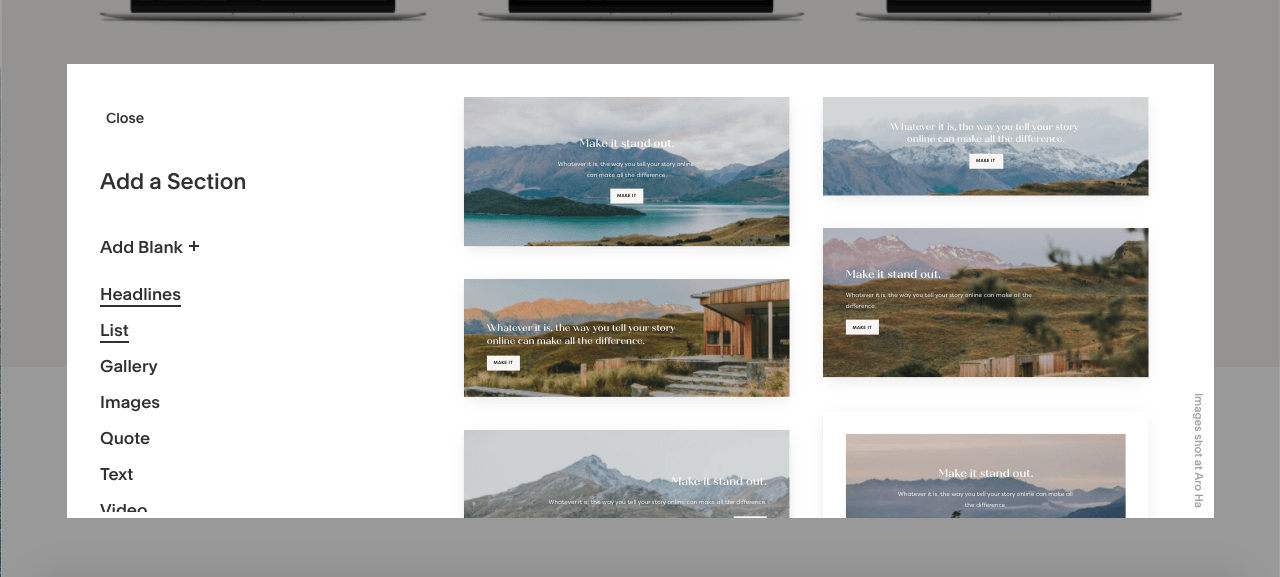
As you can see from the screenshot, there are several categories you can browse through to get an inspiration for how you’d like to style your site but ultimately it doesn’t matter as it’s really only one template with different layouts and styles applied to it.
If you scroll all the way to the bottom, you’ll notice that you can go and select a template from the previous version, 7.0.
At the time I’m writing this article, the two versions of Squarespace exist simultaneously which can be quite confusing if you’ve already started your Squarespace site BEFORE January 2020.
The most important difference between the two is that version 7.0 had a lot more templates to choose from. What’s more, some templates were grouped together in template families, each of which had a different set of features.
For example, the Bedford family and the Five template were your best choices if you wanted a blog with a sidebar.
The Brine family had the most customization options and the most features. It also had the most templates to choose from.
You can take a peek at those templates but since Squarespace is pushing the latest version for all new websites, this tutorial will be based on the 7.1 version.
2. Choose A Template
Moving along, pick any template as your starting point and click on Start With This Design button. You’ll then have the option to create your account using an email and a password or using your existing Facebook, Google, or Apple account.
If you already have a Squarespace account, go ahead and login. You’ll then be brought to your shiny new Squarespace website.
3. Get familiar with the backend of your Squarespace website
The backend of your Squarespace website is basically split into two parts. The left-hand side has all the tools you need to edit and manage your site. Here you’ll find links to manage the different aspects of your site. This includes Pages, Design controls, Commerce, Marketing, and so on.

Be sure to click on each of these menus so you can see everything that’s available and know where to go to change a setting.
The last bit on the left-hand side of the screen is your profile photo. Clicking on the photo will take you to your Squarespace account where you can see all the Squarespace websites you contribute to and the domain names associated with them.
This is also where you can edit your Squarespace profile (which shows up at the bottom of the blog posts if you enable this feature), change your Squarespace password, and more.

The right-hand side of the screen always displays your site’s live preview. This is where you will add content to all the pages on your site. At first, you’ll see the demo content but as you start adding your own photos, colors, and content, you’ll see your website come alive right before your eyes. (Had to get a bit cheesy at some point in this article!)
4. Setup The Basics
Now that you’re familiar with the Squarespace interface, it’s time to set up a few basics first and then we’ll dive into the website build process.
First, click the Edit button at the top of your Squarespace website and click on Edit Site Header. Under Site Title & Logo, enter your website name (typically your business name or your own name). If you’ve already designed a logo, this is where you can upload your website logo as well. Click Done > Save changes.
Then, click on Design > Browser Icon and upload a favicon for your website. The favicon will show up in your browser window (and your visitor’s browser when they land on your website.). Put simply, this little icon helps you tell websites apart and makes your entire website look cohesive. Click Save.
Go to the Social Sharing section. Here, upload a rectangular image that will be used as an image when someone shares your website on social media. While Squarespace doesn’t give you exact dimensions, I’ve had the most success by using an image that’s 1280x720. Click Save when you’re done and get ready to move on to the next step.
Step 6: How to build your website with Squarespace
Okay, so now we’ve got the basics in place, let’s move right along to actually building out your website with Squarespace.
Deleting Demo Content
First, go to the Pages section and delete all the pages that came with your template as they’ll only be a distraction for one, and for two, you’ll be tempted to just replace the info with your own which will make your website look pretty boring.
So trust me on this one and delete without mercy. With Squarespace 7.1, you only have two navigation options here: Main navigation which appears at the top of your page and Not linked section which is where all the pages that aren’t in your navigation menu live.
You’ll want to refer to step 4 here and add appropriate pages to your main navigation. Don’t worry about the footer navigation — we’ll be setting that up later on. For right now, let’s create our first page.
Creating Pages
Simply click the + sign to create your first page. You’ll notice that you can choose between a blank page and a designer layout. The difference between the two is that if you start with a blank page, you’ll have to add all of the content yourself.

With a designer layout, basic blocks and layout structure will already be in place. You can browse through the layouts and use them if you like them — they’ll definitely speed up the process.
Once you’ve created a page (whether it’s a blank one or a designer layout), you’ll have the option to name it and the page will appear on your right-hand screen. To edit the contents, all you have to do is click the Edit button at the top.
Editing Pages And Working With Sections And Blocks
As you enter the Edit mode, you’ll notice there are several options. First, as you hover over the page, you'll see blocks that are used on the page. Simply click on a block and you’ll be able to edit the text, swap out images, and more.

You can also click the pencil icon to access the settings for that particular section such as setting colors, width of the page, content alignment, and more.
The double-square looking icon allows you to duplicate a section and the arrows allow you to move the section up and down on the page. You can also delete sections you don’t want by clicking the trash can icon.
The blue + icon on the page will allow you to add more sections to your page. As with pages, you can add a blank section where you can add any block you want.
You can also add a predesigned section that already has certain blocks in place. Again, using premade sections for certain things is a great time-saver and will speed up the design process considerably. In any case, when you’re done designing your page, click Done> Save changes.
Page Settings
The last important bit about pages is that by clicking the cogwheel icon next to the page name will give you access to additional page settings. Here, you can change the page name as it appears in the navigation menu and the browser window, customize the URL for the page, add a social sharing image, and customize the page SEO settings.
I highly recommend that you enter an SEO title and description for each page on your site as this will improve how your site appears in search engines (more on that later) and bring you more organic traffic.
To create other pages on your site, simply follow this process until all your pages are set up. Be sure to also refer to step 4 to include relevant information and appropriate calls to action on each page of your site.
Step 7: Customize Your Site
Once you’re done with adding your content and creating the pages, it’s time to make your website look pretty. You’ll want to go to the designer tab and first click on Fonts. Since Squarespace 7.1, Squarespace includes premade font packs that you can use for your site.
This is the perfect place to start if you don’t feel confident in your font pairing skills. Simply pick a font pack that looks nice and move on to the next section.
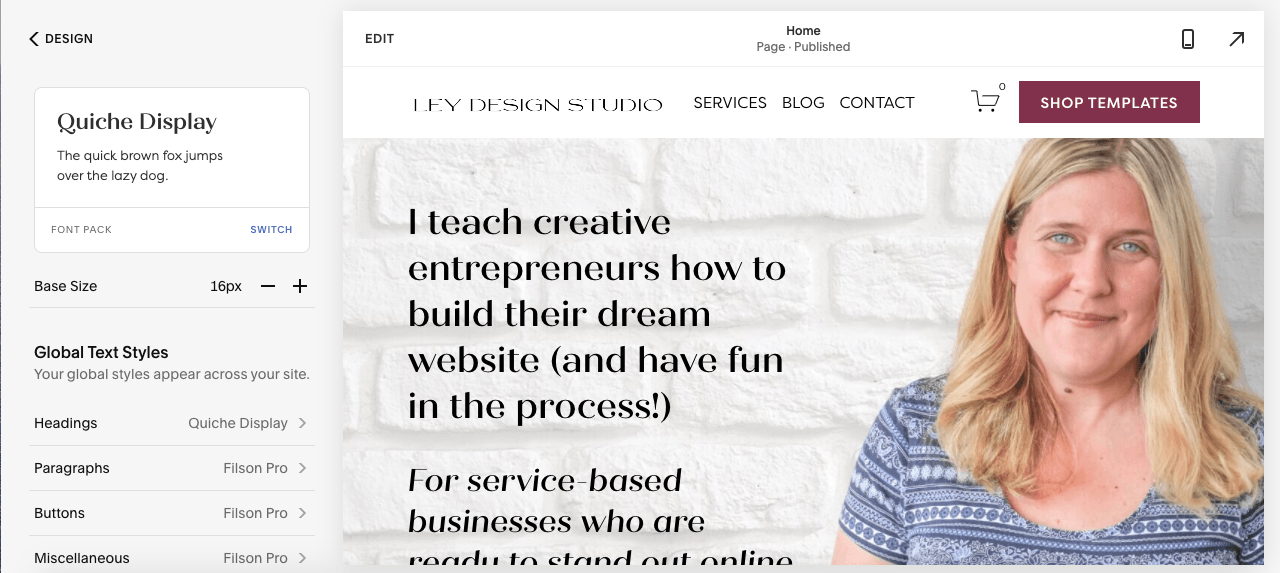
Keep in mind that you can customize each font pack with your own font choices by clicking on the options for Headings, Paragraphs, Buttons, and Meta text.
The next option is to set your colors. Simply click on the Colors section and then you have several options:
pick a premade designer palette (great choice if you’re feeling a bit stuck with color pairings)
Enter your own color codes (perfect if you already have a color palette in mind)
Let Squarespace generate a color palette from a photo or from a color (great choice if you want to speed up the process)
Once you have your colors set, Squarespace will generate color themes which you can use for different sections on the page. You can further customize these themes by clicking on the pencil icon next to the theme’s name.
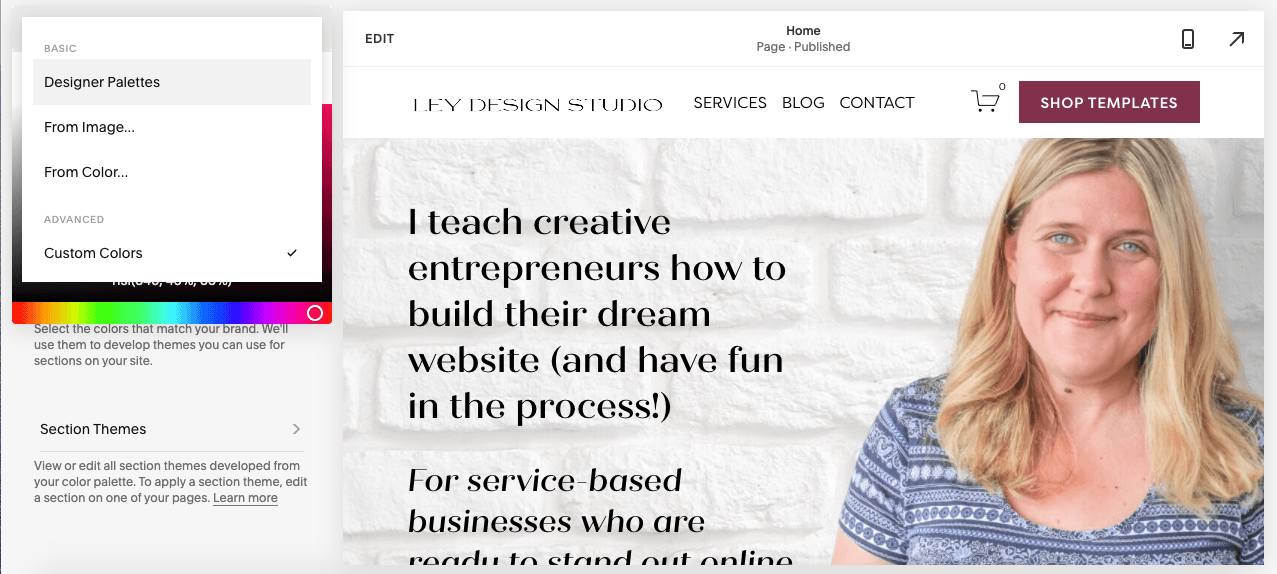
In other words, even though the section of 5 colors seems limiting (especially when two of these are black and white) at first glance, you’re free to add more colors by fine-tuning each of the different color themes.
Other options in the design section you should explore include the spacing option and customizing the special pages like the password protection screen, access denied screen, etc.
Finally, don’t forget that you can also use custom CSS if you’re proficient at it and want to truly take your Squarespace website to the next level.
Okay, we’re in the home stretch now. Only a few more technical details left to set up and your website will be ready for launch.
Step 8: Optimize For SEO
SEO might seem super technical and mysterious but in reality, it’s mostly common sense. For starters, SEO stands for Search Engine Optimization and refers to the process of optimizing your site so that it shows up higher in the search engine results (ideally, first page) when someone searches for keywords relevant to what you do.
Now, there’s a lot that goes into SEO, from making sure your site loads fast to using keywords the smart way, or even considering SEO services to get expert help, and this post certainly isn’t enough to cover it all. But, there are a few things you can do now to give your website an upper leg when it comes to SEO, so to speak.
Make sure you’ve filled out your website title as this is what will show up in the browser window when someone is on your site
Enter an SEO description for your website under Marketing > SEO.
Go through each page on your website and click the Page Settings > SEO. Then, fill out the page description and the page title.
For any image that you upload to your website, make sure it’s using a descriptive name. If the image is not used as the background image, be sure to fill out the caption field and then set it to hide. This is what the search engines will use as the image ALT text which helps them “see” images and understand your website better.
Use keywords related to your business throughout your website but don’t overdo it. Use them naturally as you would in a conversation, otherwise, your content will look spammy and search engines won’t like that.
Sign up for Google Search Console and Bing Webmaster Tools and submit your sitemap once your website is live. Squarespace automatically generates a sitemap for you and it will typically be located at yourdomainname.com/sitemap.xml. (replace yourdomainname.com with your actual domain name).
Step 9: Connect Your Social Media Accounts
When it comes to your social media accounts, there’s two things you need to do.
First, you can link to your social media accounts using the social media block on any page, section or footer of your website. You can also set those links under Settings > Social Links. This will allow you to display links to your social media profiles anywhere on your site.
Secondly, you can connect your social media accounts under Settings > Connected accounts. This will allow you to push content to your social profiles like Facebook, LinkedIn, Twitter, and Pinterest. For example, every time you publish a new blog post, you can automatically share that post as a status update on your connected platforms.
Connecting your social media accounts will also pull content from certain platforms like Instagram so you can display it on your site. For example, you will be able to display an Instagram widget.
Be sure to also sign up for Google Search Console (it’s free) and connect that account. This will allow you to submit your sitemap as I’ve mentioned earlier and it will also notify you of any potential issues on your site.
Step 10: Setup Analytics And Pixels
Although Squarespace comes with built-in analytics, Google Analytics will give you a more in-depth look at your audience. You don’t have to do this step as your site will function just fine without it.
But for more in-depth information about what visitors do on your site, this integration is very useful. To set up Google Analytics, go to Settings > Advanced > External API keys. You’ll see a field to enter your Google Analytics ID number.
Similarly, connecting a Facebook pixel will give you tons of useful information about your site visitors if you ever want to invest in Facebook ads. Keep in mind that you’ll need a Facebook page for your business first so set that one up if you don’t have it already.
Then, go to Marketing > Facebook Pixel and Ads and enter the number you got from Facebook.
Step 11: Take Care Of Technical Settings
Next up, go to Settings > Advanced > SSL and make sure it’s active. This will activate the SSL certificate which comes free with Squarespace and tells the browser that your website is secure and encrypted so bad guys can’t steal your visitors private information.
Then, go to Settings > Cookies and Visitor’s Data and enable the cookie bar. You’ll also want to customize the text and link to your privacy policy. You need the cookie notification on your website to comply with various Internet privacy laws like the GDPR regulation that came into effect in 2018.
Step 12: Choosing a Domain Name
Now that all the settings have been taken care of, it’s time to start thinking about your domain name. This is a very personal choice and there is no right or wrong answer.
Generally, you’ll want to use your business name or your own name. However, you can also opt for something else entirely if that represents the content on your website better.
For example, if you’re an interior designer, you could use a more descriptive name that reflects your services, ideal clients or the outcome you get for your clients.
A few tips to keep in mind here include:
Make sure your domain name is memorable
Make it easy to spell
Be sure the spelled out name or written name doesn’t look embarrassing
If you sign up for an annual plan with Squarespace, you can get a domain name for free for the first year directly through Squarespace. Alternatively, you can buy a domain name from a registrar like Namecheap and connect it to your Squarespace website.
Step 13: Going Live
And now it’s time for the last step of this long (but fun) journey. It’s finally time to upgrade your site and go live. To do this, go to Settings > Billing and Account > Billing.
Click on the Upgrade button and you’ll be able to see all the different subscription options for Squarespace.
You can choose between monthly and annual billing as well as between personal, business, and commerce plans.
The personal plan is the cheapest option but with this plan, you won’t be able to use some of the premium blocks like the code block or the code injection feature.
While this might not seem like a big deal, keep in mind that the code block as well as the code injection features come in handy if you need to add third-party code to your site. This can include Squarespace plugins as well as code from an email service provider like ConvertKit or Flodesk.
Related: 6 ways to display optin forms on your Squarespace website
If you don’t plan on selling products, my recommendation is to opt for the Business plan and choose an annual subscription as this will give you a 10% discount as well as a free domain name.
If you plan on launching an online store, then opt for any of the commerce plans. Advanced plan is your best bet as this will get rid of the transaction fees that Squarespace would normally charge for processing payments.
When you’re done upgrading your plan, go to Settings > Domains and either buy a domain name from Squarespace or connect a domain name you’ve bought elsewhere. The process is rather straightforward and simple.
After you have your domain name, click on Email & GSuite and sign up for a GSuite plan. Again, this is a simple and straightforward process to follow.
Finally, click on Settings > Site Availability and change it to Public.
Once you’ve completed all of the above steps, your site will be live and you’re officially in business!
Final Thoughts
Whew, that was a lot! But the good news is that now you have a kickass website for your business that not only looks good but also converts visitors into subscribers and clients. The only thing left to do now is to start promoting your website!
Still struggling to launch your website? Why not speed up the process with one of my Squarespace templates? They come preinstalled in your account so all you have to do is customize them, add your content, and upgrade your site. Check them out and get ready to launch your website!