TidyCal Review - Why I Switched from Acuity Scheduling
Heads up: this post may contain affiliate links. In other words, if you make a purchase using my link, you won’t pay a dime more but I’ll earn a small commission. My chips and salsa fund thanks you from the bottom of its heart… er stomach?
When it comes to online calendars and appointment booking software, there is no shortage of options to choose from. And for the longest time, I've been using Acuity Scheduling for my own schedule and client scheduling needs.
But recently I switched to a different tool that I discovered a few months back and I fell in love with it and I made the switch and I haven't looked back. So in today's video, I want to give you a tour of that tool and share its features and help you decide whether or not this is the right tool for you.
The tool I'm talking about is TidyCal.
What is TidyCal?
TidyCal is a relatively new scheduling software that offers a clean and user-friendly interface. You can create unlimited booking types and customize your availability for each booking type. You can connect TidyCal to your personal calendar account and see all your appointments with all your other existing obligations.
TidyCal has a free plan that allows you to create unlimited booking types and you can also offer unlimited bookings per month. However, you cannot offer paid bookings on their free plan, and you can only connect your TidyCal account to one calendar. That said, if you want to try it out and give it a go, then the free account is perfect to get started.
The best thing about TidyCal is the paid plan. It's a lifetime plan which means you pay once and you can use it forever, for as long as you need to. The one-time payment is only $29 so definitely worth it for a tool that you use pretty often in your business.
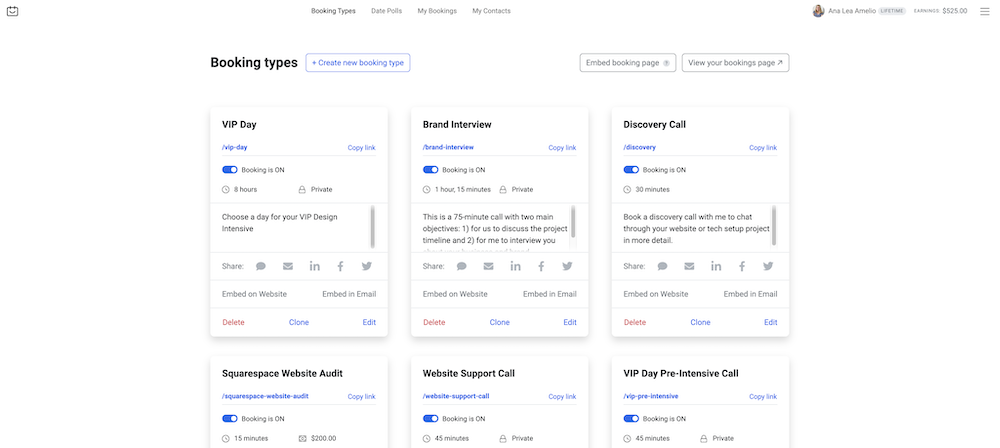
Here's how TidyCal's dashboard looks when you're logged in:
As you can see, I have a lot of different booking types created, and I just want to give you a brief overview of the features that TidyCal has. So the best way to do that is actually to create a new booking type so you can see all the features that are available.
Creating a New Appointment In TidyCal
To create a new appointment or booking type, all you have to do is click the button at the top of the screen. Once you create a new booking type, you can give it a title. I'm going to call this test booking and this will automatically generate the URL for your booking so you can easily share it on social media, on your website, in emails private chats, wherever you want.
Basic TidyCal Features
You can give a description of your appointment here and specify how long the appointment is. And then you can set whether you're available weekly or only on specific days for this booking.
You can customize what times you're available to take appointments. Sunday and Saturday are unchecked by default, but you can definitely toggle them on if that is the only time you have available for taking client appointments. And generally this will default to 8am to 5pm, but you can easily specify different windows.
So maybe Monday you're available from 8am to 10 AM. And then maybe you're also available in the afternoon from 3 PM until 5 PM. This allows you to add custom availability for each day of the week. And maybe you don't want to take appointments on Fridays and Wednesdays, so if you toggle them on, this will make those two days unavailable on your calendar.
You can also specify specific dates that you will be unavailable. So maybe you want to block off your birthday, your anniversary, your kid's birthday, or anything like that.
TidyCal Advanced Features
As I mentioned earlier, there are also advanced booking type settings, which allow you to specify whether there's any buffer between meetings, how far in the future people can book with you.
So for example maybe they can't book 60 days, more than 60 days in advance, and maybe you don't want them booking within two hours of whatever time currently is. You can also show the available time slot interval and how many maximum bookings you want to take per day, per week, or per month.
TidyCal Video Conferencing Integrations
Then you can integrate with Google Meet as well as Zoom and Microsoft Teams. You can also set up a physical location or no location at all if you conduct meetings over the phone. On top of that, you can set up a custom solution if you use a different video conferencing tool.
Other Booking Type Settings in TidyCal
You can enable guest invites and group bookings and if you're on a paid plan, you can charge for your booking. They support both Stripe and PayPal, and you can set up custom intake forms that allow you to ask a few questions when somebody makes a booking with you.
In addition to that, you can customize email reminders that go out to your clients once they've booked with you. And you can also redirect them to a confirmation page once they have made a booking.
Another cool feature is that you can have private bookings. In other words, if you set a booking type to private, it won't be visible on your public booking page. But, you can still share the URL for that appointment privately with anybody who asks.
TidyCal Booking Directory
Another interesting feature is that you can choose to display your booking on booking types directory to get more attention. Basically, TidyCal has a directory of different service providers, businesses that offer bookings. And if you tick this on, then people can search for your specific category and book an appointment right then from there. I haven't tested this feature thoroughly but it could be a nice way to get clients from unexpected sources.
And those are pretty much the main features when you're creating a booking type in TidyCal. When you're done setting it up, all you have to do is click create booking type, and that will create the new booking type and give you the link that you can share with people so they can book an appointment with you.
TidyCal Scheduling Page
And this is what a typical scheduling page looks like. As you can see here, potential clients can see the description of each booking type. They can select the date and also change their time zone, although it should automatically be detected.
And then once they click a specific time or specific date, they can choose the time slot, fill out the questions and book an appointment with you. As you can see, TidyCal has a very clean aesthetic that also looks very soft and easy on the eyes. And that's why I actually prefer it more than Acuity.
At any point in time, if you need to update the booking type, you can do so. You can come here and you can change any of these details and then click update booking type.
General TidyCal Settings
Now, if you go over here to settings, this is basically where you can set the currency for your appointments, change your booking page description, and also change the booking page theme color.
Under integrations is where you can add your Google account or Office 365 account or Apple account to sync with your calendar. For video conferences, like I said, you can connect your Zoom account, your Microsoft Teams account, and Google Meet.
I'm not going to show you the payment integration settings because obviously it has private information from Stripe, but you can also integrate your Stripe and PayPal account.
And then under Advanced, you can connect with your Zapier account. If you need to use information from TidyCal in any other apps, for example, maybe you want to send your TidyCal bookings directly to your Asana account, you can easily do that through Zapier, or you can use the API keys if you have custom applications and custom integrations.
You can also embed your booking page. So if you want to embed TidyCal within your Squarespace website or WordPress website or Wix website, you can easily do that. All you have to do is copy this code and it will display on your website.
TidyCal Date Polls
And then another feature that I wanted to highlight is you have date polls, which basically allows you to create a poll for people to choose a date for a specific event. So for example, let's say that you're planning a one day business meetup with local business owners in your network. So you can name a booking type something like business meetup and then you can suggest potential dates. You can suggest the location to be an online video conference, a physical address, or a phone number, or it can have no location. So let's say no location and then create a date poll.
And now when you copy the link, people can basically choose which date work best for them. And then you can see which date gets the most votes and schedule your meetup for that specific day.
You can also see all your bookings under My Bookings. And then under Contacts, you can see everybody who has ever booked an appointment with you. You can export your bookings and you can also filter to see all the past bookings, all bookings, or canceled appointments. You can also switch to a calendar view, which basically allows you to see your bookings in a month, week or day view.
TidyCal Pros and Cons
TidyCal Pros:
ease of use
unlimited appointment types
group bookings
paid bookings
integration with Google Meet, Zoom, and Microsoft Teams
integration with Zapier
custom booking page
can be embedded on any website
can customize email reminders
one-time payment
TidyCal Cons:
potential clients can see TidyCal branding on your scheduling page, however that's a small price to pay give the one-time price for the tool (plus, other schedulers like Calendly and Acuity have their branding on the scheduling pages too)
no ability to accept deposits for your appointments like with Acuity Scheduling
Final Thoughts
And those were the main features of TidyCal. Now, if you're interested in trying TidyCal out, they do have a free plan like I mentioned. It's perfect if you want to give it a try and decide whether or not you want to upgrade to the pro version. And if you decide that TidyCal is not for you, and you're looking for additional options for how to actually add appointment scheduling to Squarespace, I have a separate tutorial that walks you through the Squarespace scheduling feature that you can read next.
For more tips and tricks, check out these articles:


